| Principle: Lever |
Grade: 3 |
HS 3F3.3, 6F2.1 |
| Principle: Lever |
Grade: 3 |
HS 3F3.3, 4F2.1, 6F2.1 |
| Principle: Arch |
Grade: 3 |
HS 3F3.3, 4F2.1 |
| Principle: Wheel and axle |
Grade: 3 |
HS 1F1.5, 3F3.3, 4F2.2 |
| Principle: Inclined plane, Wheel |
Grade: 3 |
HS 1F1.5, 3F3.3, 6F2.2 |
| Principle: Pulley |
Grade: 3 |
HS 3F3.3, 4F2.2 |

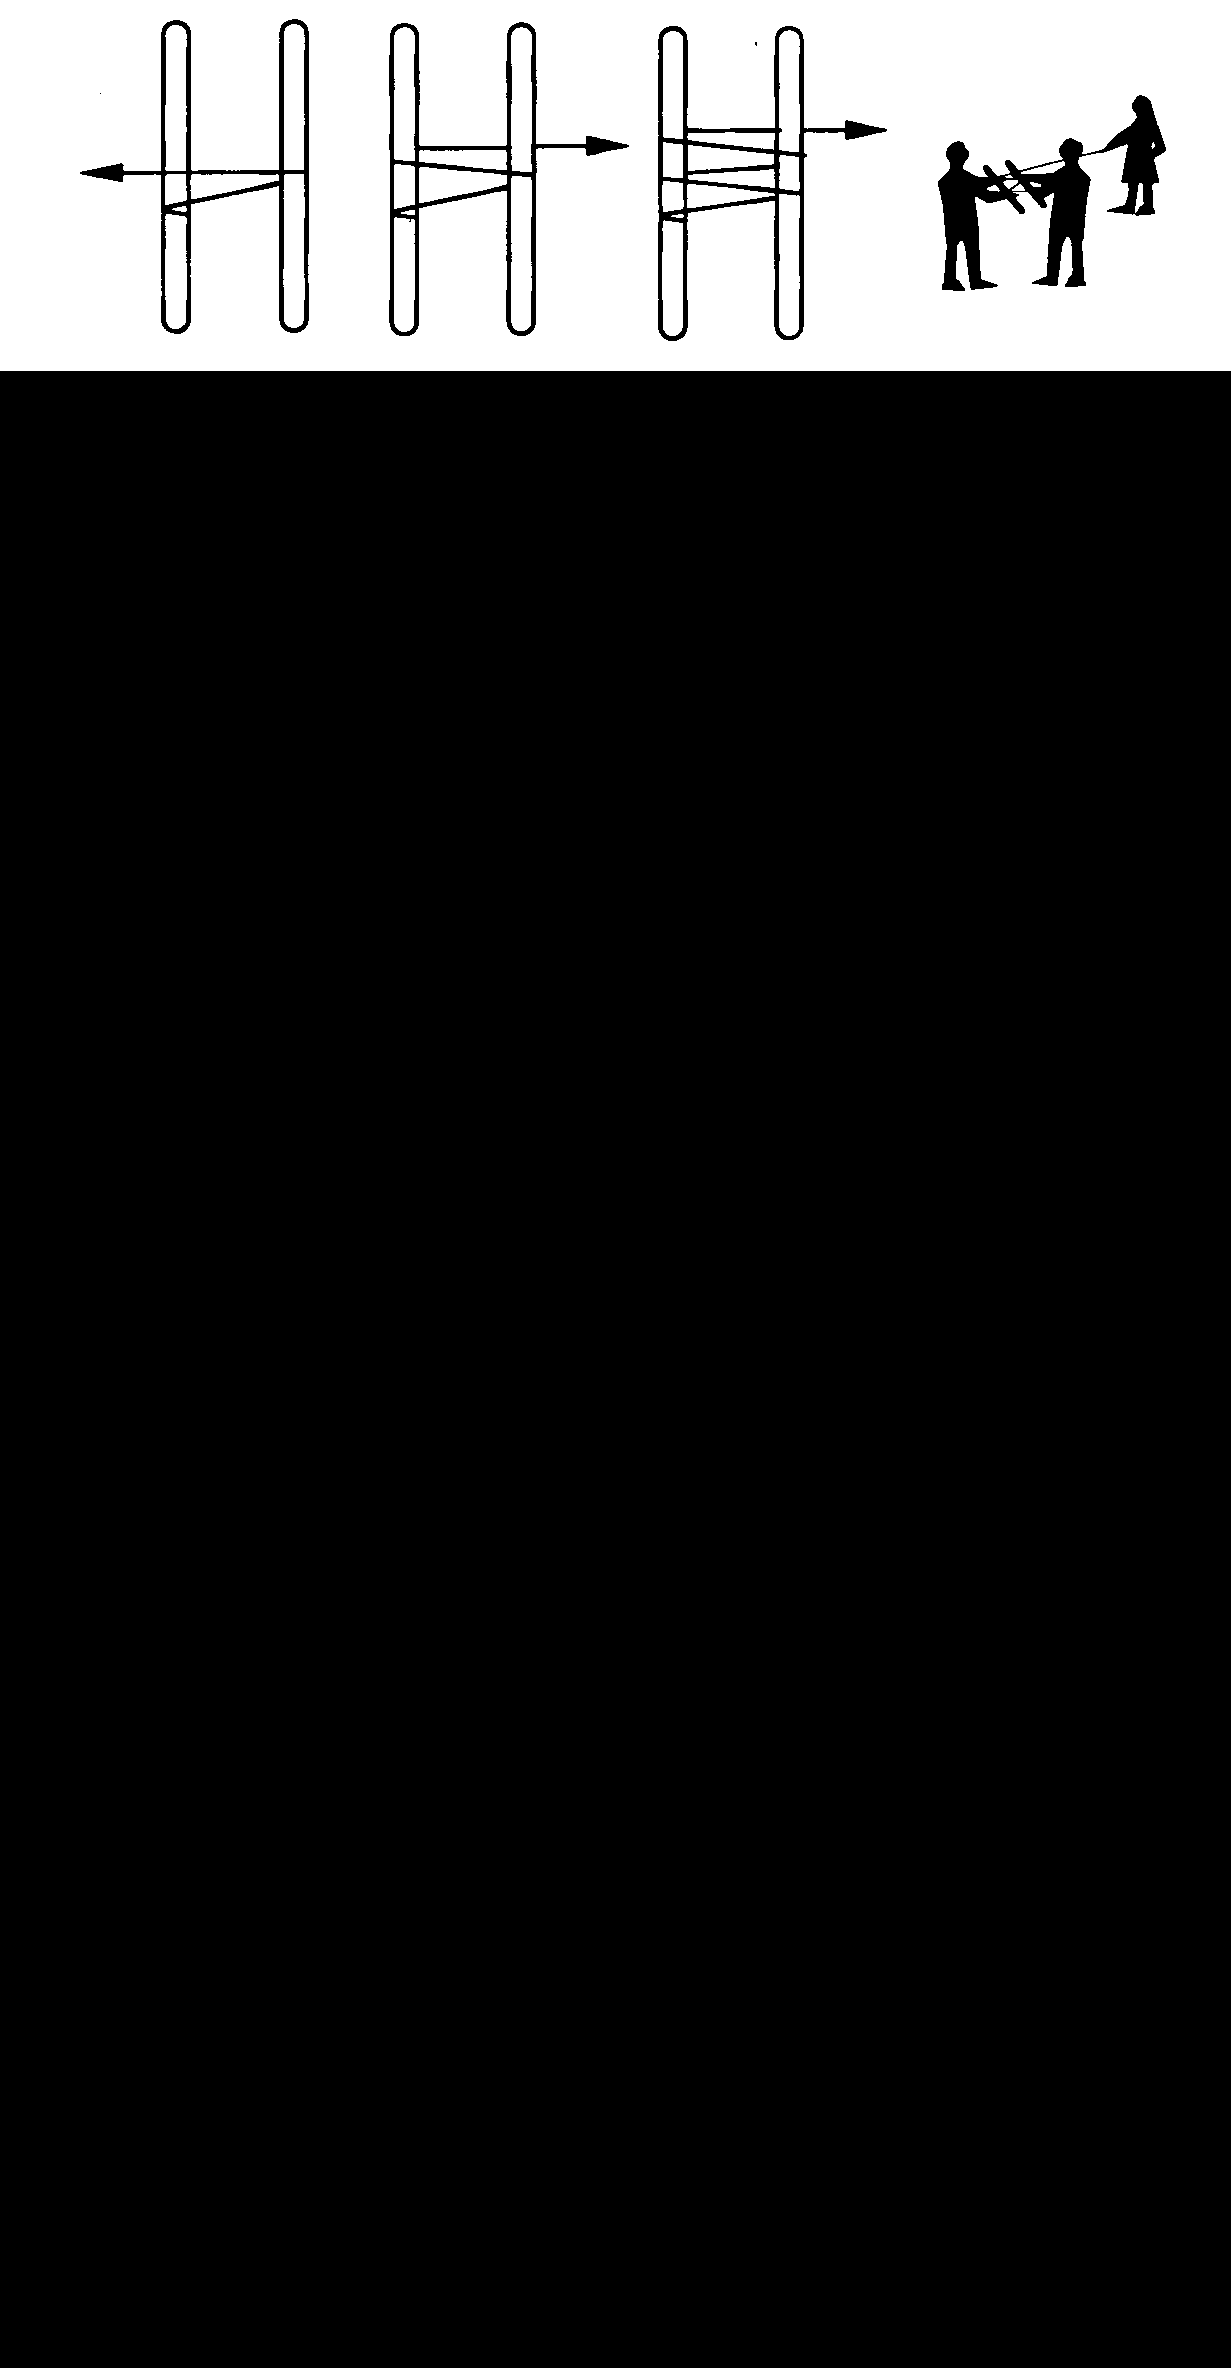
 A pulley is a machine that either doubles a tension or
halves it. When connected as shown at near right, the downward weight
of the coin filled cup is balanced by the upward tensions in the two strings.
The string is tied to the board then passed down through the pulley and then
held from above. If there is little friction in the pulley, the tension
in the right half of the string is equal to the tension in the left half.
Each portion of the string provides an upward force to the pulley - each
equal to half of the weight that the pulley supports. This arrangement
allows us to lift the weight with half of the force usually required.
However, we would have to pull the string two feet in order to raise the
cup one foot. If the arrangement on the far right is used, we still
would have to pull with half of the cup's weight, but we would pull down
instead of up.
A pulley is a machine that either doubles a tension or
halves it. When connected as shown at near right, the downward weight
of the coin filled cup is balanced by the upward tensions in the two strings.
The string is tied to the board then passed down through the pulley and then
held from above. If there is little friction in the pulley, the tension
in the right half of the string is equal to the tension in the left half.
Each portion of the string provides an upward force to the pulley - each
equal to half of the weight that the pulley supports. This arrangement
allows us to lift the weight with half of the force usually required.
However, we would have to pull the string two feet in order to raise the
cup one foot. If the arrangement on the far right is used, we still
would have to pull with half of the cup's weight, but we would pull down
instead of up.

 If we used two pulleys connected as shown in the near left, we would only
need a tension in the string of one-third of the weight of the cup + coins,
and we would have the pull the string three feet to raise the cup by one foot.
The string is attached to the lower pulley, which is also attached to the
cup. The string runs up over the upper pulley, and then down and around
the lower pulley, and is then held from above. Three upwards tension
forces are applied to the pulley and the attached cup, which are balanced
by the one downward force of the cup's weight. If the arrangement in
the middle is used, we still would have to pull with one-third of the cup's
weight, but we would pull down instead of up. The arrangement on the
far left is essentially identical to that in the middle, but a single "double"
pulley is used on top instead of two separate pulleys.
If we used two pulleys connected as shown in the near left, we would only
need a tension in the string of one-third of the weight of the cup + coins,
and we would have the pull the string three feet to raise the cup by one foot.
The string is attached to the lower pulley, which is also attached to the
cup. The string runs up over the upper pulley, and then down and around
the lower pulley, and is then held from above. Three upwards tension
forces are applied to the pulley and the attached cup, which are balanced
by the one downward force of the cup's weight. If the arrangement in
the middle is used, we still would have to pull with one-third of the cup's
weight, but we would pull down instead of up. The arrangement on the
far left is essentially identical to that in the middle, but a single "double"
pulley is used on top instead of two separate pulleys.

 If we used three pulleys connected as shown in the near right, we would only
need a tension in the string of one-fourth of the weight of the cup + coins,
and we would have the pull the string four feet to raise the cup by one foot.
The string is attached to the board at top, runs down and around the upper
pulley in a double pulley that is attached to the cup, then up and over the
upper pulley that is attached to the board, down and around the lower pulley,
and is then held from above. Four upwards tension forces are applied
to the double pulley and the attached cup, which are balanced by the one
downward force of the cup's weight. If the two other arrangements are
used, we still would have to pull with one-fourth of the cup's weight, but
we would pull down.
If we used three pulleys connected as shown in the near right, we would only
need a tension in the string of one-fourth of the weight of the cup + coins,
and we would have the pull the string four feet to raise the cup by one foot.
The string is attached to the board at top, runs down and around the upper
pulley in a double pulley that is attached to the cup, then up and over the
upper pulley that is attached to the board, down and around the lower pulley,
and is then held from above. Four upwards tension forces are applied
to the double pulley and the attached cup, which are balanced by the one
downward force of the cup's weight. If the two other arrangements are
used, we still would have to pull with one-fourth of the cup's weight, but
we would pull down. 
 A cheap alternative to commercially available pulleys are plastic rollers
for sliding screen doors. The type I prefer is shown above at left.
To make a double pulley out three of these, bend the 2-1/4" metal tab on
all three so that it lies flat, then drill a second hole in each metal tab
3/4" away from the pre-drilled hole, closer to the pulley. Set two
of the pulleys back-to-back, rollers down, with the third pulley between
them, roller up, with the holes lined up. Bolt them together with two
small bolts and nuts. To fashion a hook, bend a length of chain link
fencing tie wire (the kind you can bend with your fingers) into a "U" and
wrap the ends around the bolts holding the double pulley together so that
the bottom of the U hangs down below the double pulley as shown at left.
Attach two extra nuts to hold the tie wire in place on the bolts, and bend
the metal band on top to center the top pull
A cheap alternative to commercially available pulleys are plastic rollers
for sliding screen doors. The type I prefer is shown above at left.
To make a double pulley out three of these, bend the 2-1/4" metal tab on
all three so that it lies flat, then drill a second hole in each metal tab
3/4" away from the pre-drilled hole, closer to the pulley. Set two
of the pulleys back-to-back, rollers down, with the third pulley between
them, roller up, with the holes lined up. Bolt them together with two
small bolts and nuts. To fashion a hook, bend a length of chain link
fencing tie wire (the kind you can bend with your fingers) into a "U" and
wrap the ends around the bolts holding the double pulley together so that
the bottom of the U hangs down below the double pulley as shown at left.
Attach two extra nuts to hold the tie wire in place on the bolts, and bend
the metal band on top to center the top pull
| Principle: Screw, Inclined Plane |
Grade: 3 |
HS 3F3.3, 4F2.3, 6F2.2 |
| Principle: Wheel and axle |
Grade: 3 |
HS 3F3.3, 4F2.2 |
 The wheel and axle is essentially a lever. The axle
acts as a fulcrum, and the wheel or wheels attached to this axle can support
a load with a force applied somewhere else on the same wheel or on a different
wheel. To make the simple wheel and axle shown at right, drill holes
in the centers of a large plastic lid from a peanut butter jar and a baby
food jar lid. The holes need to be slightly larger
The wheel and axle is essentially a lever. The axle
acts as a fulcrum, and the wheel or wheels attached to this axle can support
a load with a force applied somewhere else on the same wheel or on a different
wheel. To make the simple wheel and axle shown at right, drill holes
in the centers of a large plastic lid from a peanut butter jar and a baby
food jar lid. The holes need to be slightly larger| Principle: Pulley |
Grade: 3 |
HS 3F3.3, 4F2.2 |
| Principle: Inertia |
Grade: 5 |
HS 1F1.3, 3F3.1, 4F1.2 |
| Principle: Inertia |
Grade: 5 |
HS 4F1.2 |
| Principle: Inertia |
Grade: 5 |
HS 1F1.3, 3F3.1, 4F1.2 |
| Principle: Inertia, Momentum |
Grade: 5 |
HS 4F1.1 |
| Principle: Inertia, Newton's First Law |
Grade: 5 |
HS 1F1.1, 3F3.1, 4F1.1, 4F1.2, 6F1.2 |
| Principle: Action - Reaction, Newton's 3rd Law, Projectile
motion, Acceleration |
Grade: 5 |
HS 3F3.1, 4F1.2, 5F2.2, 6F1.1, 6F1.2 |
| Principle: Action - Reaction, Newton's 3rd Law |
Grade: 5 |
HS 3F3.1, 4F1.2, 5F2.2 |
| Principle: Action - Reaction, Newton's 3rd Law |
Grade: 5 |
HS 3F3.1, 4F1.2, 5F2.2 |
| Principle: Action - Reaction, Newton's 3rd Law |
Grade: 5 |
HS 3F3.1, 4F1.2, 5F2.2 |
| Principle: Action - Reaction, Newton's 3rd Law, Momentum |
Grade: 5 |
HS 3F3.1, 4F1.2, 5F2.2 |
| Principle: Action - Reaction, Newton's 3rd Law |
Grade: 5 |
HS 3F3.1, 4F1.2, 5F2.2 |
| Principle: Energy, Compound Machines |
Grades: 4, 6 |
HS 3F3.2, 4F1.2, 6F2.2 |
| Principle: Energy, Motion, Acceleration |
Grades: 4, 5 |
HS 3F3.1, 3F3.2, 4F1.2, 5F2.2, 6F1.1, 6F1.2, 6F2.2 |
| Principle: Energy, Compound Machines |
Grades: 4, 6 |
HS 3F3.2, 4F1.2, 6F2.2 |
 Cut the top 1/4 off of one two liter plastic pop bottle
and the top 1/3 off of another. Cut two 3-inch half-circle holes out
of the shorter bottle on opposite sides of each other. With a hole
punch, make two opposite holes one-half inch below the top of the shorter
bottle - in the middles of the uncut upper edges. Also cut one hole
one-half inch below the bottom of one of the half-circle cuts. Place
a pencil or wood dowel through the upper holes, and attach a second pencil
or dowel to its middle with a rubber band. Thread and tie a rubber
band through the lower hole, and attach it to one end of the second pencil.
Poke opposing holes near the bottom of a small plastic or paper serving cup,
and stick the other end of the second pencil through them to form the throwing
cup of the catapult. Fill the taller pop bottle 1/3 full of pinto beans
for ballast. Put the shorter pop bottle with the catapult arm into
the taller bottle as shown in the figure, and it is ready to fire!
By pulling the cup back, you do work (force x distance) and energy is stored
in the rubber band. This energy is retrieved when the cup is released.
The catapult will then do work on the projectile, and the kinetic energy
(energy of motion) of the projectile is increased. Only soft or light
projectiles should be used (marshmallows work great!), and students should
never be allowed to shoot them at each other. I pulled this out of
"Gizmos & Gadgets" by Jill Frankel Hauser. See my Good Book list
for a complete reference.
Cut the top 1/4 off of one two liter plastic pop bottle
and the top 1/3 off of another. Cut two 3-inch half-circle holes out
of the shorter bottle on opposite sides of each other. With a hole
punch, make two opposite holes one-half inch below the top of the shorter
bottle - in the middles of the uncut upper edges. Also cut one hole
one-half inch below the bottom of one of the half-circle cuts. Place
a pencil or wood dowel through the upper holes, and attach a second pencil
or dowel to its middle with a rubber band. Thread and tie a rubber
band through the lower hole, and attach it to one end of the second pencil.
Poke opposing holes near the bottom of a small plastic or paper serving cup,
and stick the other end of the second pencil through them to form the throwing
cup of the catapult. Fill the taller pop bottle 1/3 full of pinto beans
for ballast. Put the shorter pop bottle with the catapult arm into
the taller bottle as shown in the figure, and it is ready to fire!
By pulling the cup back, you do work (force x distance) and energy is stored
in the rubber band. This energy is retrieved when the cup is released.
The catapult will then do work on the projectile, and the kinetic energy
(energy of motion) of the projectile is increased. Only soft or light
projectiles should be used (marshmallows work great!), and students should
never be allowed to shoot them at each other. I pulled this out of
"Gizmos & Gadgets" by Jill Frankel Hauser. See my Good Book list
for a complete reference.| Principle: Energy, Compound Machines |
Grades: 4, 6 |
HS HS 3F3.2, 4F1.2, 6F2.2 |
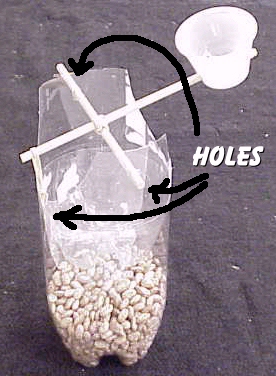
 Drill a 1/4 inch hole in the bottom of a 20 oz plastic
pop bottle, and a second hole in the cap. Tie two rubber bands together
and thread them through the bottom hole. Loop one end of the rubber
band over a short length of straw so that it prevents the rubber band from
snapping up through the hole in the bottom of the bottle as it is stretched.
Use a coat hanger or wire hook to pull the rubber band up through the top
of the bottle. Thread the rubber band through the hole in the cap,
through two washers and loop it around a second straw. Fill the bottle
about 1/3 with pinto beans for ballast. Screw the cap onto the bottle,
and attach artsy foo-foo thingies to the ends of the top straw. Wind
the whirlygig up by spinning the top straw and let it whirl! As you
wind, you apply a force over a distance, doing work. This work is stored
as potential energy in the rubber band. After you release it, this
energy is transferred to kinetic energy as it unwinds. I also pulled
this one out of Jill Hauser's book.
Drill a 1/4 inch hole in the bottom of a 20 oz plastic
pop bottle, and a second hole in the cap. Tie two rubber bands together
and thread them through the bottom hole. Loop one end of the rubber
band over a short length of straw so that it prevents the rubber band from
snapping up through the hole in the bottom of the bottle as it is stretched.
Use a coat hanger or wire hook to pull the rubber band up through the top
of the bottle. Thread the rubber band through the hole in the cap,
through two washers and loop it around a second straw. Fill the bottle
about 1/3 with pinto beans for ballast. Screw the cap onto the bottle,
and attach artsy foo-foo thingies to the ends of the top straw. Wind
the whirlygig up by spinning the top straw and let it whirl! As you
wind, you apply a force over a distance, doing work. This work is stored
as potential energy in the rubber band. After you release it, this
energy is transferred to kinetic energy as it unwinds. I also pulled
this one out of Jill Hauser's book.| Principle: Force per unit area |
Grade: 5 |
HS 2F1.1, 5F1.2 |
| Principle: Center of mass |
Grade: 5 |
HS 5F1.2 |
| Principle: Projectile motion, acceleration |
Grade: 5 |
HS 5F2.2, 6F1.1, 6F1.2 |
| Principle: Rotational Inertia |
Grade: 5 |
HS 5F2.1, 6F1.2 |
| Principle:Work and Energy |
Grade: 4 |
HS 3F3.2, 5F1.3, 5F3.1 |